FatCow Plan for $3.15/mo. only

10 November 2016

Joomla Advanced - Adding Contacts

In this chapter, we will study about Adding Contacts in Joomla. It stores the contact details of the company.

Joomla Adding Contacts

Following are the simple steps used to set the Joomla contacts.
Step (1) − Go to System → Global Configuration as shown in the following screen.
Joomla System Settings
Next, click on Contacts in Joomla Global Configuration and you will get to see the following screen.
Joomla Adding Contacts

Joomla Advanced - Adding Banners

In this chapter, we will study about Adding Banners in Joomla. It displays the active banners and allows you to use different banners for advertising on webpage.

Adding Banners

Following are the simple steps to add Banners in Joomla.
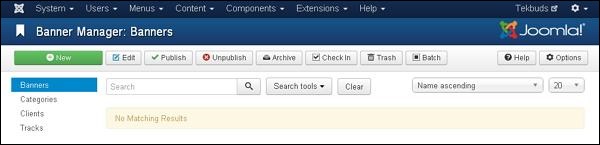
Step (1) − Click Components → Banners → Banners in joomla administrator, you will get the following screen.
Joomla Adding Banners
Step (2) − Next, click on New button, you will get the following screen.
Joomla Adding Banners
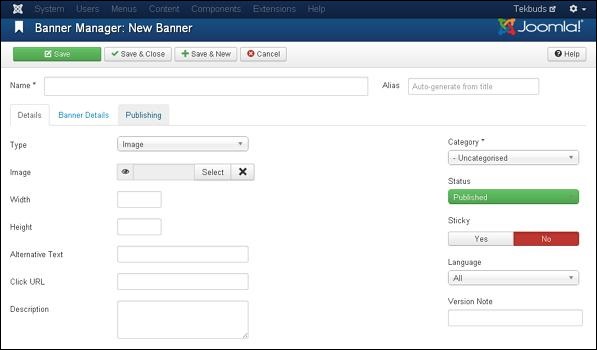
There are different tabs present in above screen. By default, Details tab is active. This tab displays the details of the banner.
Below we have mentioned the details of the fields present on the Details tab.
  • Name − This block is used to write the name of the item.
  • Alias − This is auto generated from the given name.
  • Type − Displays the banner type i.e. image or HTML code.
  • Image − Displays the image file of the banner.
  • Width − Set the width of the banner image.
  • Height − Set the height of the banner image.
  • Alternative Text − It represents the alternative text to display on banner image.
  • Click URL − When user clicks on the banner then it will navigate to the specified URL.
  • Description − Brief description about the banner.
Following fields are present on the right side of the Details tab.
  • Category − It displays the category of the banner.
  • Status − It displays the status of the banner such as Published, Unpublished, Archived and Trashed.
  • Sticky − It displays whether the banner is Sticky or not. For that we have to select either ( Yes/No ) button.
  • Language − It displays the specified language of the banner.
  • Version Note − It displays the version of the items on the banner.

Joomla Advanced - Article Metadata

In this chapter, we will study about Article Metadata in Joomla. Metadata describes details of the article in short. It makes it easy to work with a particular data.

Joomla - Article Metadata

Following are the simple steps used to set the Joomla article metadata −
Step (1) − Go to System → Global Configuration as shown in the following screen.
Joomla System Settings
Next, click on Global Configuration, you will get to see the following screen. Fill the fields with appropriate values.
joomla article metadata

Joomla Advanced - Formatting Content

In this chapter, we will study how to format content on the Joomla website.

Formatting Content

Following are the simple steps to format content in Joomla −
Step (1) − Click on Article Manager in Control Panel as shown below.
joomla Formatting Content
Step (2) − Select the article to be formatted by clicking on the checkbox. Next, click on the Edit button as shown below.
joomla Formatting Content
Step (3) − Next, the article opens up for editing as shown below. Here we are aligning the heading Apple in center using center alignment. Similarly, you can edit the image alignment, font size and so on. You can study about the editor in detail in the chapter Joomla - Adding Content.
joomla Formatting Content

Toolbar

Following are the toolbar options −
  • Save − Saves the contents and stays on the same screen.
  • Save & Close − Saves the content and closes the screen.
  • Save & New − Saves the content and opens a new content page.
  • Save as Copy − Saves the formatted content and copies it.
  • Versions − It is used to select versions of the page.
  • Close − Closes the article without formatting.

Joomla Advanced - Adding Content

In this chapter, we will study how to add content on the Joomla website.

Adding Content

Following are the simple steps to add content in Joomla.
Step (1) − Click on Content → Article Manager → Add New Article as shown below.
joomla Adding Content
Step (2) − After clicking on Add New Article, you will get the editor page of the Article Manager as shown below.
joomla Adding Content
Following are the details of the fields on editor page of the Article Manager.

Title

joomla Adding Content
  • Title − It is used to write the title of the article. This title gets displayed on the page.
  • Alias − It is auto generated from the given title name.

TinyMCE editor

It is a WYSIWYG Editor, which is similar to a word processor interface where we can edit the contents of the article.
joomla Adding Content
First Row − They appear on the top of the Editor page and contain a group of related commands.
  • Edit − Undo, Redo and Cut, Copy, Paste, Select all.
  • Insert − Insert image, Insert link, Horizontal line, Special Character.
  • View − Visual Aids.
  • Format − Bold, italic, underline and various formats are available in this group.
  • Table − It is used to display the table format in the article by using row and columns.
  • Tools − It displays the source code of your article in html format and the code will be displayed in a new popup window.